
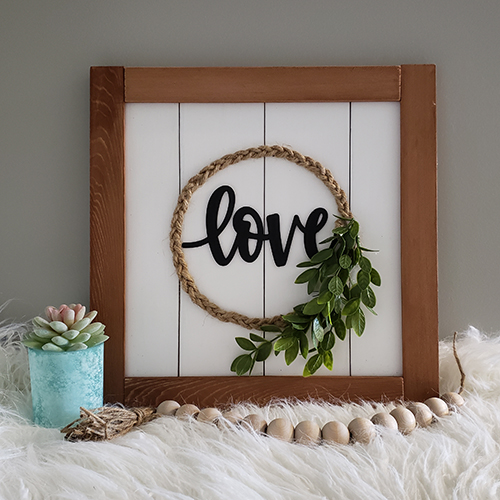
I created this faux wood sign yesterday, which was inspired from a sign I saw on the Wayfair site. I created mine out of foam board from the Dollar Tree, lath (a thin strip of wood), a cereal box, and some faux greenery.
I used my hot knife, which is an x-acto knife which plugs in and gets very hot, to cut my foam board. This knife is great because it sort of melts into the foam board to give you a smooth cut. I just couldn’t get a nice cut with my regular x-acto knife, and my edges were always coming out rough. I got my hot knife in a wood burning kit from Rona for $30.00, which I thought was a pretty good price for everything that came in it. You can find these knives on Amazon as well. I cut one square at 14″ x 14″, and my 4 strips at 3.5″ x 14″. These strips created a faux shiplap look. I then painted the outer edges of my “shiplap” a darker brown (to match the wood frame that would be added later) with cheap dollar store paint, and painted the tops of my foam boards white. I didn’t paint the bottom square board, but you could paint it a darker color so if you leave a tiny gap between your 3.5″ strips you’ll get a darker looking gap. I painted all four sides of my 3.5″ strips brown, which I didn’t actually need to do. All I needed to paint were the sides that would be exposed on the very outside of my sign, so the three outer edges of my two outside strips, and the tops and bottoms of the two inside strips (if that makes sense). I’ve created a video which will explain it better!
I then hot glued my strips onto my square piece of foam, and cut my lath strips with my handy little hand saw, which I got at Home Depot. It’s great, because I can use it right in my craft room. I cut two strips at 14 1/4″, and two at approximately 11 1/4″. I added the extra 1/4″ to make up for the tiny gaps I put between my four shiplap strips. If you want your outer edges to be flush, I’d cut the bottom square piece of foam a little bit bigger than 14″. My wood frame hangs over the outer edges of my sign a little, but that doesn’t bother me.
I painted my wood frame pieces with my dollar store brown paint, with some water added to it. I wanted to give it more of a stained look, rather than painted, so the wood grain would show through. I should have added more water to my mixture to make it a little lighter, but I think it still turned out pretty good. It then hot glued those onto my the edges of my sign, over top the “shiplap”.
To create the circle I used some jute string that I bought at Dollarama. It’s thicker than the twine, and was perfect for creating my braid. I wrapped the top end with the jute twine and sealed it a bit of hot glue. I then braided my string extra long, and measured it to the size of circle I needed, and closed off the bottom ended with more twine and glue. I cut off the extra string and hot glued it onto the foam board, as well as hot glued on my faux greenery.
To create the Love chipboard, I used my LOVE SVG, and cut it out three times from a cereal box with my Cricut Maker. I used the setting Light Chipboard within my program. Once the words were finished cutting and the mat was released, I automatically pushed the CUT button again on my machine to cut it all a second time. Don’t touch your mat when the machine pushes it out, otherwise it won’t cut along the exact same lines again. Just leave it, and hit cut a second time.
When cutting a piece of cereal box cardboard, I like to place it on my mat with the logo side up. I used a Kellogg’s corn flakes box, so I made sure the corn flakes logo was facing up. This way the blade will cut through the logo paper first. I find otherwise it has a hard time cutting through that layer of paper when it’s on the bottom, and it’s a huge hassle to deal with. Because I like the plain cardboard side up when I paint my cut out, I flip my image within my Cricut program, so I’m not trying to paint over the logo. Again, my YouTube video will explain this better.
Once cut out, I glued each letter together with mod podge, then spray painted my chipboard word with a matte black. I hot glued this into the middle of my braided ring, and my sign was done!
This was actually a pretty easy sign to create. If I could learn to use my hot glue gun without burning myself at least once, that would be fantastic! I think you could use other types of faux greenery or flowers on it as well, and it would look super pretty. I stuck with the plain green just for the sake of making it look more like the original picture.
I hope you give it a try. If you haven’t make signs yet with foam board you should definitely give it a try. It’s super cheap, and looks just like wood when it’s done!
You can find my Love SVG Here.